Showing posts with label manicure. Show all posts

Wednesday, November 13, 2013

Review- Gold Bond Ultimate Intensive Healing Hand Cream

Walking through Walgreen's a while back this particular cream caught my eye. I had been wanting to try it because the commercial for it was so intriguing and since the winter months are coming up I thought it would be perfect. So I picked up a smaller tube of it just to see if I would like it, and if I did then I could always go back and get the bigger size.


One thing that I look for in a hand a lotion is that it can't be greasy, and it can't have a strong scent. I hate hand creams that smell like old ladies. So I took a quick whiff inside the store hoping no one would see me what I was doing and it actually smelled really good. It has a light citrus scent. After using this for a month or so now I can actually say this is going to be a staple in my product stash. I love how quickly it absorbs into your skin.

This stuff is like liquid gold for your hands! As advertised on the package: works into skin fast, works to heal breaks and sores due to dryness (also fast), isn't obtrusively greasy like many lotions and keeps working after water exposure. It claims that it absorbs into your skin within 15 seconds. It really does! If you all get a chance to pick this Gold Bond Hand cream up, please do. You won't regret this purchase.

Friday, November 1, 2013

Freehand Fridays with Lady Maid Nails

So I am starting a series with Lady Maid Nails where we are planning on challenging each other to various free hand nail art projects that we will then both recreate. Our first is inspired by a throw pillow from Amanda's couch! Here is a picture of the pillow from which we drew inspiration on!

photo courtesy of Ladymaidnails.blogspot.ca and her couch

 Here is my version of what I came up with.....


I am going to be honest with you, this design took a lot of practicing and attempts so I could have something that would be somewhat believable. So this is what I came up with. I used a very small detailing brush for the flowers. I bought it at Sally's Beauty Supply. A good alternative to this brush is in my new "SHOP my Favorites" section in the menu bar. Check it out along with some other favorites of mine I use for nail care.


Well what do you all think?  Please go check the very creative nail artist/blogger Amanda from Lady Maid Nails! Please go show her some love!!!!


Saturday, October 26, 2013

Tape Mani-using striping tape

Striping tape is super easy to work with. I purchased mine at a local Walmart for about $2. Super cheap and I was able to get 3 rolls of it...SCORE!!!! So for this mani I simply used white as my base coat, then placed my striping tape down (make sure your white base polish is completely dry before putting the tape down), then I put black and red polish down. That is super simple! If you all want to see a more detailed instructions, let me know! Here is your finished look!


If you have any request of what you all would like to see more of on here then let me know! XOXO~ Ashley

Favorite Manis thus far.....

Since I have started my nail art journey, I have quite alot of favorites but today I will showing you 2 of the many favorites. What type of nail art do you like on your hands? Let me know what you all would like to see here on this blog, I have some more pictorials coming up soon. Have a great day!!!!


Flowers and Tribal


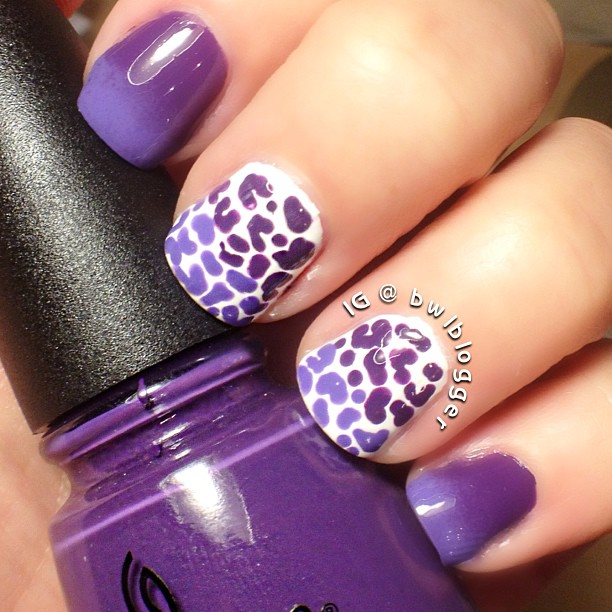
Leopard Print

Tuesday, October 15, 2013

Breast Cancer Awareness- Nail Art

So for today's post, I decided to show off a manicure that I entered into a contest on Instagram. If you all want info on the contest itself check out @blueemster on Instagram for more details. Its a great way to get the word out about breast cancer! Hope you enjoy!


Remember to always check yourself monthly, its never too early to start. The National Breast Cancer Foundation has a great guide on how you can check yourself at home, check it out!

Monday, October 14, 2013

Galaxy Nails - Tutorial

So I have seen a ton of tutorials on how to create galaxy nails but I feel my tutorial is a bit easier to follow than some I've seen. No offense to any others of course, you all are amazing. Let me know what you all think So the following is a pictorial of how you can create your own galaxy nails at home.


Products Used: Sally Hansen-Thinking of Blue, Orly-Aqua Pixel, CG- For Audrey, Sinful Colors-Cinderella, Sinful Colors-White, Small brush-purchased at Sally's, and Q-tips
Paint your nails the base coat of your choice, with these I am going to do one plain galaxy nail and one drip effect galaxy nail.
Take your detailing brush and polish the area where you want your drips. I usually start with the drips first and work my way up.
Polish the inside your of your drip using the darkest color. I used the same detailing brush I used when painting on the drip.
Next you want to take a Q-tip and soak it in Acetone/polish remover, and dab it into a lighter polish. (here I used Sinful Colors- Cinderella). Then dab it onto your nail with a light hand until you create a the effect you want.
Then take another polish (here I used CG-For Audrey) using the Q-tip method by soaking and dabbing it into the polish and then dabbing onto your nail.
Here I used a really bright neon blue, I forgot to picture it and I forgot the name it...sorry I must have had a brain fart. But you do the q-tip method her too. See its really so far!!!!
Next I took Orly-Aqua Pixel, or any glitter polish you may have and my detailing brush and randomly made brush strokes in random places. On my drip nail I outlined the drip in glitter. Oh la la...
Last I used my detailing brush and white polish and painting stars, and used the end of my brush to dot on smaller stars! Finish with your favorite top coat, and BAM!!!! You have galaxy nails!!!!


Monday, October 7, 2013

Supernatural Lacquer-Review

I had the privilege of swatching some amazing new nail polish from Supernatural Lacquer this weekend. Today you will see two polishes that are from their Halloween collection. These are available now for purchase from http://www.etsy.com/shop/SupernaturalLacquer


Candy Corn

This is a beautiful light orange jelly base with orange, yellow, white and iridescent green purple shifting glitters. I love the fact that the glitters are all different shapes and sizes. I swatched this polish over a medium dark blue polish. I love that you can really see the shifting colors at all different directions.  Good Lord this looks like candy in a bottle.

2 coats over base polish


Bewitched

This is described as a mixture of mauve, black, pink, red, gold and gold holo moon glitter in a mauve tinted jelly base. This is a beautiful color inside and out of the bottle. I chose to swatch this over black polish with a red accent nail. This polish also looks amazing over a lot of other colors as well. This is perfect for the any upcoming spooky parties, and when ever you feel you need  a lot of sparkle in your life.

2 coats over base coat


My overall impression of Supernautral Lacquer is that they are on point for creating beautiful polishes. If you are finicky about your glitter polishes, trust me this is one you are going to want to have in your collection. I was impressed with the coverage of this polish. I am pretty particular when it comes to glitter polish. My problem with glitter polishes is uneven coverage. Drives me nuts!!!!!! You will not see this with these polishes. Supernatural Lacquer has even coverage and the glitters and sparkles distribute beautifully!  In their Halloween Collection there are 6 total polishes. I have 2 of the 6 from the collection. I can only imagine that the others are just as good as these. Which ones are you going to be picking up?

Again, you can find these polishes at http://www.etsy.com/shop/SupernaturalLacquer

Also check out the rest of her store there for other polishes. You can also find her on Facebook which you can find out about upcoming collections and releases. 
Monday, September 30, 2013

Flower Nails - Tutorial

I have been asked quite a bit to do a tutorial on my flower nails. So here I have for you a quick pictorial on how you can create your own flower nails at home. Now you don't have to choose the same colors I did...be creative with that part. the only tool you will need is a very small detailing brush.  I purchased mine at Sally's for $3.

Polish your nails your color of choice and let dry.
Next with your small detailing brush, paint one small line.
Then paint a shorter line next to it creating the image you see above.
Paint another line on the opposite side and there you have it...you have created your first petal for your flower
Add a few more petals by following the first few steps.
Here I added a more flowers using the same technique. I like half flowers more than I like whole flowers
Last you want to grab a darker polish color and follow the steps from how you created the original petal but this time leave some of that original color peaking out.
Here you see my finished design. Again there are endless options of color combos you can choose. Have fun! Its super simple! If you have any questions, please let me know!

Wednesday, September 25, 2013

Bow Nails-Tutorial

Here we have a quick pictorial on how to create you very own bow nails. All you need is a small brush and your favorite polish colors.

First, paint your nails white (or any color you want)

Using the small brush paint the outline of the bow.
Fill in using the color you have chosen for your outline and then use a darker color and paint in the details. (tools used-very small brush)
I wanted to add more detail to mine, so this is an optional step. Here I used a a light pink to create a little dimension to the design.
Here is you finished look! I love it! Don't you?
I hope you enjoy these short tutorials. Let me know what you all would like to see next! Have a great day!

Wednesday, September 4, 2013

TRIBAL NAILS- Tutorial

Here is a quick and easy pictorial so you can create "Tribal" nails for your self.


Polish your nails white for your base color.

Using a striping brush paint horizontal lines (choose what ever colors you want for this part)

Continue to paint lines, until you get something like this.

Next take a darker color and paint designs! Be creative, at this point you really can't mess up.

Your finished look should look something like this!


Hope you all found this pictorial to easy, and very self explanatory. If there is a design that you want a specific tutorial on let me know!  I don't mind putting one together!


Tuesday, September 3, 2013

Bow Nails!

Bows are very girly and so I decided to try my hand at bow nails! I have a tried this look in the past but I couldn't get the design right until I found a brush small enough to create the details needed to make the bow. I think it turned out pretty good for a first timer.

Polishes used:
  • Sally Hansen "Rock me Baby"
  • Wet n Wild "On a Trip"
  • China Glaze "Grape Pop"
  • One very small detailing brush (I got mine at hobby lobby)
I am planning on doing a pictorial "how-to" so you all can create this look for yourselves!

Let me know what you think. Have a great day!


Wednesday, August 28, 2013

My Nail Care Routine

Everybody has a different routine when taking care of their nails. Some may do nothing at all, and some may go to great lengths to get their nails perfect. Well I am one of those people that are in the middle. I don't do a whole lot but I do enough to make sure they are well cared for.

On a daily basis I constantly moisturize my hands, paying very close attention to my cuticles. Cuticles can get very dry, and once they dry you will notice cracking which that is how "hang nails" can occur.
When I file my nails, I use a glass file, I find that using a glass file on my nails prevents my  nails from splitting, and peeling. When you file your nails, its important to go in one direction trying not to bend the nail. Bending the nail weakens your nails which could cause you to have a break in your future. After I file, I use the end of my glass file to gently push back my cuticles, when I say gently...I mean...gently. I never ever cut or trim my cuticle, I just simply put a cuticle cream on them and that's it.

See how simple that is! Below is a picture of my products I use on my nails. Nothing special!


Monday, August 26, 2013

Ombre love and other cute stuff...

I won't say I am a pro at ombre' nails YET but I think this purple gradient turned out pretty freaking good! I also added another ombre I did with a little animal flare!


Last but certainly not least. I have been following this particular girl for quite some time. She has amazing nail art and her designs that she creates are absolutely stunning! This next mani is a recreation of one of her designs.If you get a chance, please check out her blog here

Saturday, August 24, 2013

Some of my favorite manis.....

These nail designs have been some of my favorite manis that I have done in the past couple of months. If you all would like to see a pictorial showing how to create this design yourself at home let me know which one you all would like to see. Hope you all are having an amazing day and great weekend!
Glitter and Animal Print
Dot Gradient
Large Floral